Triumph Rocket III Project Page
Not so Pocket Rocket
As a site dealing with big bikes, we just had to get our own Rocket III one day. Not only has it got the biggest engine in production motorcycling – an insane 2.3 litre triple – but at 350 kilos and with a five and a quarter gallon fuel tank, it’s physically imposing too. This is a bike with some astonishing stats… like the torque output of almost 150 ft/lbs(that’s about 25% more than the ZZR1400) or the fact that each piston displaces more capacity than an entire CB750. Wondering what it would actually be like to ride, and fresh from our test of the V-Rod, we were keen to get our hands on a Rocket. As a non-profit site we couldn’t stretch to a new ‘un, so we eventually picked up a low miler 2008 Classic for just shy of eight grand UK from Rochdale Honda who had taken it in as p/ex.
We did what we always do with our project or long term test bikes; first off, a good service, then some fun fitting a few accessories and finally an in-depth clean and polish before we do any road testing. Typically we take the bike on road and on-track and if time permits, on tour.
The previous owner had saved us some readies by fitting crash bars and a few other tasty bits and pieces, such as extra gauges and a sissy bar and rack.
We describe the stuff we did on this page and there are then links from here to videos or more detailed articles elsewhere.
Project Stage 1
The essential idea behind this project then, is to get the bike into A1 condition ready for its role as long term test bike, which will probably include some short distance touring. We also love adding a tons of extras and as we fit these we usually shoot some video showing how we did it.
First things first

Image: Avon Tyres
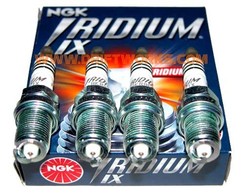
First up we did the service items….NGK kindly donated some fab iridium plugs so we changed those, then we did an oil and filter change, chucked on new HH sintered pads front and rear and gave the brake pistons a good clean up. A new air filter and general check over and lube completed the service. Videos on our YouTube channel show some of this work HERE.
We fitted new Avon Cobra tyres – our favourite cruiser rubber – a full review of these is due soon.Tyres were fitted at a most reasonable price by Lightning Services of Trowbridge. An ace little workshop in the tradition of real motorcycle mechanics and experts in the art of making the impossible possible. They even do mail order.

NGK Iridium Plugs
Check out our plug change video by clicking image below…
Comfort
The previous owner had already fitted a touring seat with two backrests…

…and a nice little OEM Fly Screen…

Flipmeister Paddock Stand
Some jobs need the bike to be upright – but there’s no center stand. Happily you can buy a paddock stand from Flipmeisters….Click image to go to video of install of this handy gear.
You can buy HERE
Check out also R3Owners forum….HERE

Image: Flipmeister Products
Protection

Image: Triumph Motorcycles

Image: Triumph Motorcycles
The bike came with front and rear dresser bars – which are pretty well essential given the potential for damage if this baby falls over…
We added some OEM Triumph Fog Lights – click pic above to see our YouTube video for how we got on with the fitting. The wiring loom is in the bike already which was handy. We always like extra lights for safety purposes.
Suspension and brakes
The shocks have always been a weak point of earlier Rockets, so we didn’t wait to test the originals, but swapped them right away for some nice Progressive 440’s with heavy duty springs. Fitting and test video coming soon.

Image: JC Motors
Paint and bodywork

The original paintwork was not bad – a lovely classic 70’s style 2-tone with gold detailing. We got to work with some Muc-Off products and the results will be shown in our final project photos. Chrome was polished using our flexible shaft (steady Matron) and drill.
Other stuff

Unbelievably Triumph don’t fit this £12,000 plus bike with a either an alarm or immobiliser as standard – just a plain old key like we used to have back in the 70’s. However, like the fog lights, the wring loom is for the alarm is actually in the bike already. We bought the OEM alarm (actually a Datatool S4) and fitted it ourselves. As well as this we fitted Datatag security marking. See YouTube Video for how we got on…
Wollo Airsplitter Air-horn
Click image below to go to video of our install experience..One thing we can say right away though – THESE Are very loud!!!


